
Deployment
Section 19: Deployment
Section titled “Section 19: Deployment”19.1 What Is Deployment?
Section titled “19.1 What Is Deployment?”Deployment is the process of taking your application from development to production — making it accessible to real users on the internet. It involves building, configuring, hosting, and maintaining your Next.js application on a server or cloud platform.
Simple analogy: Writing code is like baking a cake. Deployment is delivering it to the customer’s table — packaged, fresh, and ready to be enjoyed.
19.2 Why Deployment Matters
Section titled “19.2 Why Deployment Matters”| Aspect | Description |
|---|---|
| Availability | Makes the app accessible 24/7 globally |
| Performance | Production builds are optimized (minified, tree-shaken) |
| Security | Enforces HTTPS, environment variable isolation |
| Scalability | Real hosting can scale to millions of users |
| Monitoring | Production environments support error tracking and analytics |
19.3 Deployment Lifecycle
Section titled “19.3 Deployment Lifecycle”
19.4 Production Build Commands
Section titled “19.4 Production Build Commands”# Install dependenciesnpm install
# Create an optimized production buildnpm run build
# Start the production server (Node.js required)npm run start
# Inspect build output sizesnpx next build --debugThe npm run build command:
- Compiles TypeScript
- Bundles and minifies JavaScript
- Optimizes images
- Generates static pages where possible
- Creates the
.nextdirectory with all output
19.5 Deployment Option: Vercel (Recommended)
Section titled “19.5 Deployment Option: Vercel (Recommended)”Vercel is the company behind Next.js and offers zero-config deployment.
# Install Vercel CLInpm install -g vercel
# Deploy from project rootvercel
# Deploy to productionvercel --prod
Automatic features on Vercel:
- Edge Network (CDN) globally
- Automatic HTTPS via Let’s Encrypt
- Preview deployments on every PR
- Environment variable management
- Serverless Functions for API routes
- Image optimization via
next/image
| Feature | Vercel Free | Vercel Pro |
|---|---|---|
| Deployments | Unlimited | Unlimited |
| Bandwidth | 100 GB/mo | 1 TB/mo |
| Serverless Functions | 100 GB-hrs | 1000 GB-hrs |
| Custom Domains | Unlimited | Unlimited |
| Team Collaboration | 1 member | Unlimited |
19.6 Deployment Option: Docker
Section titled “19.6 Deployment Option: Docker”Docker packages your app into a portable container that runs the same on any server.
# DockerfileFROM node:20-alpine AS base
# Install dependencies only when neededFROM base AS depsRUN apk add --no-cache libc6-compatWORKDIR /appCOPY package.json package-lock.json ./RUN npm ci
# Rebuild the source codeFROM base AS builderWORKDIR /appCOPY --from=deps /app/node_modules ./node_modulesCOPY . .
ENV NEXT_TELEMETRY_DISABLED 1RUN npm run build
# Production imageFROM base AS runnerWORKDIR /app
ENV NODE_ENV productionENV NEXT_TELEMETRY_DISABLED 1
RUN addgroup --system --gid 1001 nodejsRUN adduser --system --uid 1001 nextjs
COPY --from=builder /app/public ./publicCOPY --from=builder --chown=nextjs:nodejs /app/.next/standalone ./COPY --from=builder --chown=nextjs:nodejs /app/.next/static ./.next/static
USER nextjsEXPOSE 3000ENV PORT 3000
CMD ["node", "server.js"]version: '3.8'services: web: build: . ports: - "3000:3000" environment: - DATABASE_URL=${DATABASE_URL} - NEXTAUTH_SECRET=${NEXTAUTH_SECRET} restart: unless-stopped
nginx: image: nginx:alpine ports: - "80:80" - "443:443" volumes: - ./nginx.conf:/etc/nginx/nginx.conf - ./certs:/etc/nginx/certs depends_on: - web⚠️ Enable
output: 'standalone'innext.config.jsfor minimal Docker images:next.config.js
19.7 Deployment Option: AWS
Section titled “19.7 Deployment Option: AWS”# Using AWS Amplifynpm install -g @aws-amplify/cliamplify initamplify add hostingamplify publish
# Using AWS EC2 (manual VPS approach)ssh ubuntu@your-ec2-ip
# On server:sudo apt update && sudo apt install -y nodejs npm nginxgit clone your-repo && cd your-reponpm ci && npm run buildpm2 start npm --name "nextjs" -- startpm2 save && pm2 startup19.8 Deployment Option: VPS Server
Section titled “19.8 Deployment Option: VPS Server”A VPS (Virtual Private Server) gives you full control. Use PM2 to keep Next.js running.
# Install PM2 process managernpm install -g pm2
# Start Next.js with PM2pm2 start npm --name "nextjs-app" -- start
# Save PM2 process listpm2 save
# Generate startup script (survives reboots)pm2 startup
# Monitor logspm2 logs nextjs-apppm2 monit
19.9 Deployment Architecture Diagram
Section titled “19.9 Deployment Architecture Diagram”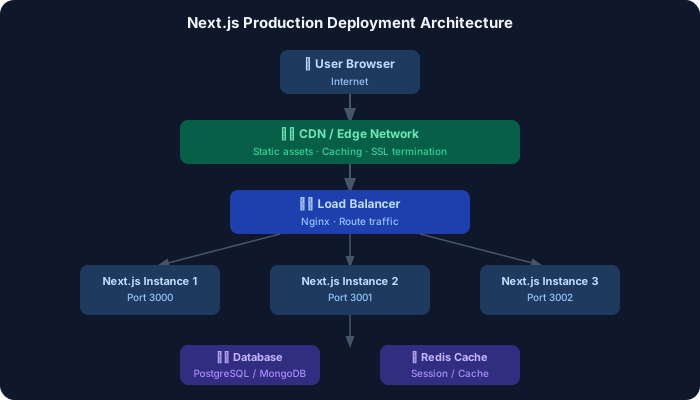
19.10 Environment Variables
Section titled “19.10 Environment Variables”# .env.local (never commit to git)DATABASE_URL=postgresql://user:pass@localhost:5432/mydbNEXTAUTH_SECRET=your-secret-hereNEXTAUTH_URL=http://localhost:3000NEXT_PUBLIC_STRIPE_KEY=pk_test_...
# .env.productionNEXTAUTH_URL=https://yourdomain.com| Variable Prefix | Exposed to Browser? | Use For |
|---|---|---|
NEXT_PUBLIC_ | ✅ Yes | Public keys, feature flags |
| No prefix | ❌ No | DB URLs, secrets, API keys |
// Accessing env varsconst dbUrl = process.env.DATABASE_URL; // Server onlyconst stripeKey = process.env.NEXT_PUBLIC_STRIPE_KEY; // Client + Server19.11 CI/CD Workflow
Section titled “19.11 CI/CD Workflow”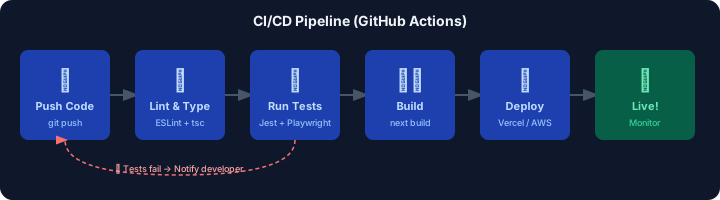
GitHub Actions example:
name: Deploy to Production
on:  push:    branches: [main]
jobs:  deploy:    runs-on: ubuntu-latest    steps:      - uses: actions/checkout@v4
      - name: Setup Node.js        uses: actions/setup-node@v4        with:          node-version: '20'          cache: 'npm'
      - name: Install dependencies        run: npm ci
      - name: Type check        run: npx tsc --noEmit
      - name: Lint        run: npm run lint
      - name: Run tests        run: npm test -- --ci
      - name: Build        run: npm run build        env:          DATABASE_URL: ${{ secrets.DATABASE_URL }}
      - name: Deploy to Vercel        uses: amondnet/vercel-action@v25        with:          vercel-token: ${{ secrets.VERCEL_TOKEN }}          vercel-org-id: ${{ secrets.ORG_ID }}          vercel-project-id: ${{ secrets.PROJECT_ID }}          vercel-args: '--prod'
19.12 Domain, SSL & Monitoring
Section titled “19.12 Domain, SSL & Monitoring”Domain Configuration
Section titled “Domain Configuration”- Buy domain from Namecheap, Cloudflare, or GoDaddy
- Add DNS A record pointing to your server IP
- Add CNAME for
wwwpointing to root domain - In Vercel: Settings → Domains → Add custom domain
SSL (HTTPS)
Section titled “SSL (HTTPS)”- Vercel: Automatic, powered by Let’s Encrypt
- Self-hosted: Use Certbot:
sudo certbot --nginx -d yourdomain.com
Monitoring Basics
Section titled “Monitoring Basics”# Check application healthcurl https://yourdomain.com/api/health
# View PM2 logspm2 logs --lines 100
# Monitor resourcespm2 monitexport async function GET() { return Response.json({ status: 'ok', timestamp: new Date().toISOString(), uptime: process.uptime(), });}19.13 Deployment Comparison Table
Section titled “19.13 Deployment Comparison Table”| Platform | Ease | Cost | Scalability | Control | Best For |
|---|---|---|---|---|---|
| Vercel | ⭐⭐⭐⭐⭐ | Free → $20/mo | Auto | Low | Startups, MVP |
| Docker + VPS | ⭐⭐⭐ | $5–$20/mo | Manual | High | Full control |
| AWS Amplify | ⭐⭐⭐⭐ | Pay-per-use | Auto | Medium | AWS ecosystem |
| Railway | ⭐⭐⭐⭐ | $5/mo | Auto | Medium | Simplicity |
| DigitalOcean | ⭐⭐⭐ | $12/mo | Manual | High | VPS experience |
19.14 Best Practices for Deployment
Section titled “19.14 Best Practices for Deployment”- ✅ Use separate
.env.local,.env.staging,.env.productionfiles - ✅ Never commit secrets — use CI/CD secret management
- ✅ Enable
output: 'standalone'for Docker to minimize image size - ✅ Run
npm ci(notnpm install) in CI for deterministic builds - ✅ Set up health check endpoints for load balancers
- ✅ Use a CDN in front of your server for static assets
- ✅ Enable HTTP → HTTPS redirect
- ✅ Set
NEXT_TELEMETRY_DISABLED=1in Docker for privacy
19.15 Common Mistakes
Section titled “19.15 Common Mistakes”| Mistake | Problem | Fix |
|---|---|---|
Committing .env files | Secret exposure | Add to .gitignore |
Using npm install in Docker | Non-deterministic deps | Use npm ci |
Missing NEXTAUTH_URL in prod | Auth breaks | Set all required env vars |
| No process manager | App dies on crash | Use PM2 or systemd |
Forgetting output: 'standalone' | Huge Docker images | Set in next.config.js |
| HTTP in production | Insecure | Always enforce HTTPS |
19.16 Interview Questions — Deployment
Section titled “19.16 Interview Questions — Deployment”Beginner:
- What is the difference between
npm run buildandnpm run start? - What is the
.nextdirectory and what does it contain? - How do you set environment variables in Next.js?
Intermediate:
4. What does output: 'standalone' do in next.config.js?
5. How would you set up a CI/CD pipeline for a Next.js project?
6. What is the purpose of a load balancer in a deployment?
Advanced: 7. How would you deploy Next.js to a multi-region setup for global performance? 8. What strategies would you use to achieve zero-downtime deployments? 9. How do you handle database migrations in a CI/CD pipeline?